Introduction: Ready for a Door Glow-Up?
Imagine coming home after a long, tiring day. Your hands are full of grocery bags. Instead of fumbling for your keys, you tap your phone—or even say a magic word—and the door swings open. That’s the beauty of smart locks: making life easier, safer, and a little cooler.
But here’s the thing: smart locks aren’t just plug-and-play for every door. Your door might need a bit of a “spa day” before it’s ready for this shiny new tech. Think of it like setting the stage before a big performance. Preparation is key. If you skip the groundwork, you might find yourself in a pickle, struggling with tools, measurements, or worse—a lock that doesn’t fit.
So, let’s walk through everything you need to know to prep your door for a smart lock installation, step by step. Don’t worry, you don’t need to be a master carpenter or a tech whiz. We’ll keep it light, relatable, and super practical. Ready to give your door the smart treatment? Let’s get started!
1. Is Your Door Smart-Lock Compatible? (It’s Not You, It’s the Door)
Before you grab that shiny new gadget, make sure your door is up for the challenge. Not all doors are ready for a smart lock out of the box.
Door Thickness for Smart Locks
First, grab a ruler or tape measure. Most smart locks are designed for standard doors that are between 1 3/8 inches (35mm) and 2 inches (50mm) thick. This range fits almost all interior and exterior doors in North America, but some older or custom doors might be thinner or thicker. If your door is outside this range, you’ll need to make adjustments or pick a lock that fits your specs.
Pro Tip: Measure at a few spots. Doors can swell, especially if you live somewhere humid!
Door Material Requirements for Smart Locks
Most smart locks work great on wooden, metal, or fiberglass doors. Glass doors are a no-go—imagine trying to screw something heavy into a window! If you have a particularly soft or flimsy door, you might want to reinforce it before installing a heavy lock.
Smart Lock Backset Measurement
The backset is the distance from the edge of your door to the center of the deadbolt hole (where the lock goes through). Standard backsets are 2 3/8 inches or 2 3/4 inches. Check your smart lock’s specs and make sure your door’s backset matches. If it doesn’t, some locks come with adjustable hardware, but it’s good to know before you start.
2. Measure Twice, Buy Once (Don’t Skip This Step!)
When it comes to smart locks, getting the right fit is half the battle. Here’s what you need to measure:
Measuring Door for Smart Lock
- Door thickness (see above)
- Backset (distance from door edge to hole center)
- Deadbolt hole diameter (the big round hole)
- Deadbolt faceplate (the rectangular piece that sits flush with the door edge)
How to Measure Door Thickness for Smart Lock
Wrap your measuring tape around the door at the spot where the lock goes. Note the number in inches or millimeters.
Standard Door Sizes for Smart Locks
If your measurements match these numbers, you’re golden:
- Thickness: 1 3/8” – 2”
- Backset: 2 3/8” or 2 3/4”
- Deadbolt hole: 2 1/8” diameter
- Faceplate: 1” x 2 1/4”
If your door has weird measurements, don’t panic. Many smart lock brands sell adapter kits.
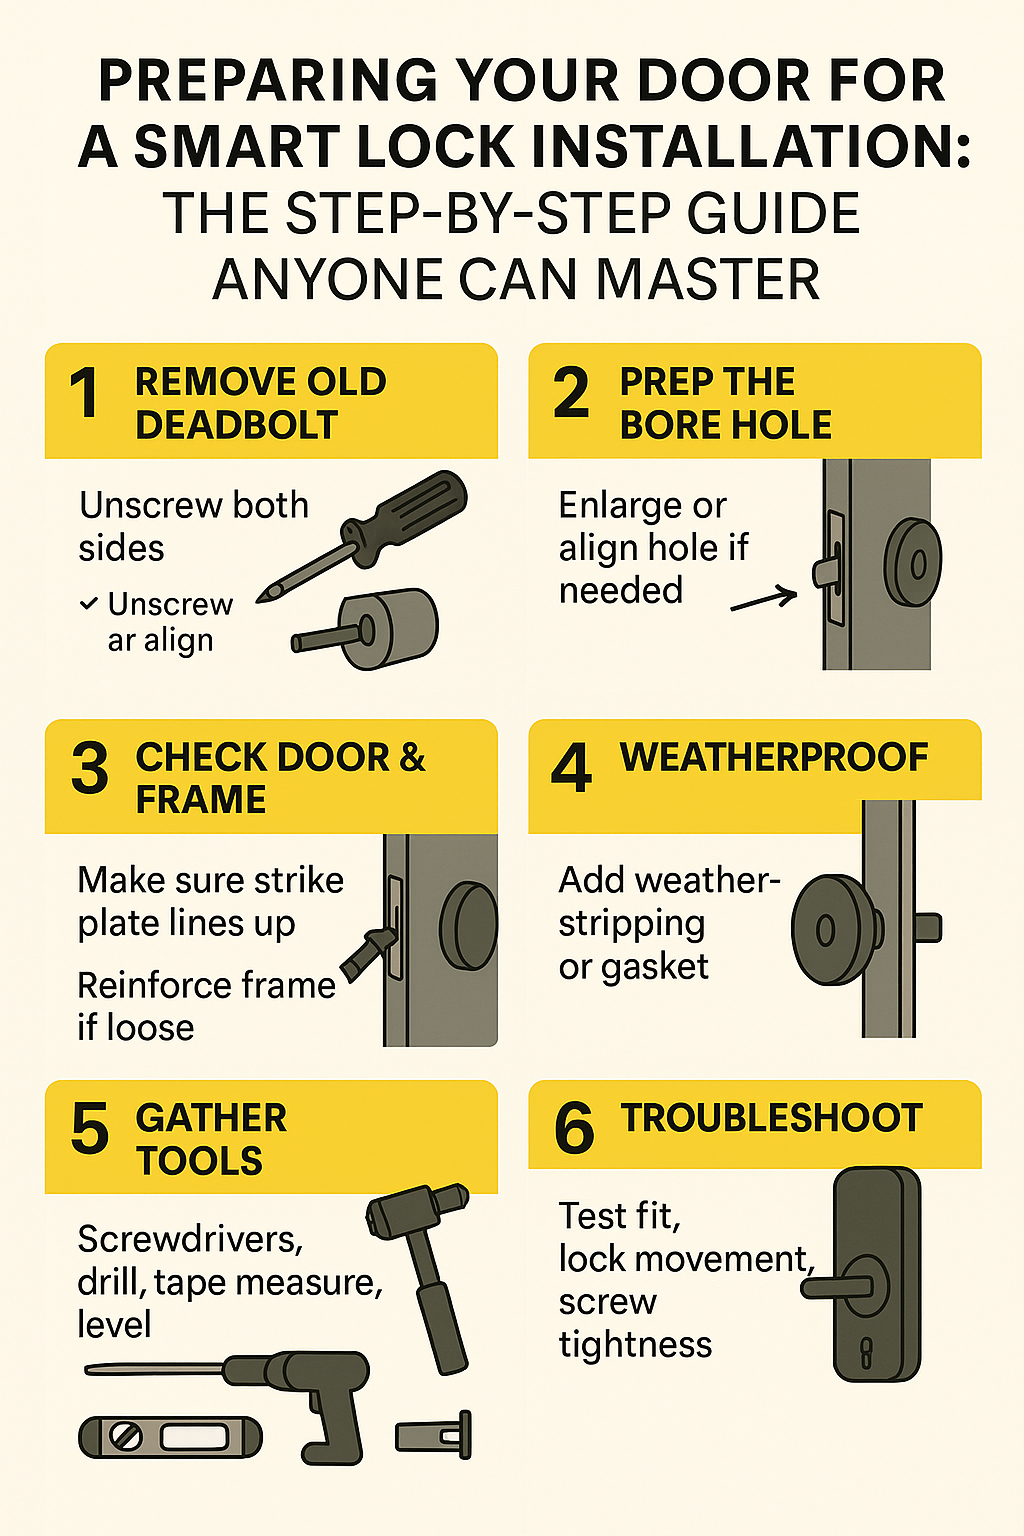
3. Out With the Old: Removing Your Deadbolt
Let’s say goodbye to that old lock. If your door already has a deadbolt, you’ll need to remove it first.
Existing Deadbolt Removal Guide
- Grab a screwdriver (usually Phillips head).
- Unscrew the inside plate (the part you turn to lock/unlock).
- Pull apart both sides—they should come off like two slices of bread.
- Remove the deadbolt mechanism from the edge of the door.
- Keep all screws together (just in case you need them).
How to Remove Old Deadbolt for Smart Lock
Take it slow. Sometimes the screws are tight. If they’re stuck, use a little WD-40 or gently tap with a rubber mallet. If the lock feels glued to the door, wiggle it side to side.
4. The Perfect Fit: Preparing the Bore Hole
Here’s where the magic happens: the big round hole where your smart lock will live.
Deadbolt Hole Size for Smart Lock
Most smart locks require a 2 1/8-inch diameter hole. If your door has a smaller, older hole (like 1 1/2 inch), you’ll need to widen it with a hole saw. This is a little scary, but take it slow, measure carefully, and you’ll be fine.
Smart Lock Bore Hole Dimensions
Double-check your lock’s instructions. Some smart locks, especially slim models, can work with smaller holes, but most need the standard size.
Adjusting Bore Hole for Smart Lock
If your hole is too small, use a hole saw (you can rent one at a hardware store). If it’s too big, you might need a door reinforcement plate.
5. Strike Plate & Door Frame: The Unsung Heroes
Don’t ignore your door frame! A strong lock needs a strong place to latch.
Strike Plate Alignment for Smart Lock
The strike plate is the metal piece on the door frame that the bolt slides into. Make sure it’s lined up perfectly with your new lock.
How to Align Strike Plate for Smart Lock
- Close the door and see if the deadbolt lines up with the hole.
- If not, you may need to adjust the plate up, down, or sideways.
- Fill any old screw holes with wood filler and drill new pilot holes for a tight fit.
Strengthening Door Jamb for Smart Lock
A lock is only as strong as the door frame. If your door jamb feels soft, reinforce it with longer screws (at least 3 inches) and a heavy-duty strike plate. This is what stops a burglar from just kicking the door in.
Door Frame Reinforcement for Smart Lock
Some people even add a metal door jamb reinforcement kit for extra security—worth considering if you want your smart lock to work as advertised.
6. Keeping the Weather Out (and Your Lock Working!)
Smart locks are tough, but water and weather can still cause problems, especially on exterior doors.
Smart Lock Weatherproofing Tips
- Check for gaps around your door and lock. Water can sneak in and cause trouble.
- Apply weatherstripping to seal up gaps and keep the rain (and bugs!) out.
Weatherstripping for Smart Lock Doors
Easy fix: stick-on foam weatherstripping works wonders. It’s cheap and takes just a few minutes to apply.
Sealing Door for Outdoor Smart Lock
If your lock is exposed, you might want to add a rubber gasket between the lock and the door. This helps keep water out of the electronics.
Painting or Finishing Door Before Smart Lock Install
If your door needs a fresh coat of paint or stain, do it before installing the lock. Wet paint and electronics don’t mix!
7. Tools You’ll Need (Aka, Don’t Bring a Butter Knife to a Wrench Fight)
Having the right tools makes life easier. Here’s what you’ll likely need:
Smart Lock Installation Tools Needed
- Tape measure
- Phillips and flathead screwdrivers
- Power drill (with bits)
- Hole saw (if needed)
- Pencil (for marking)
- Chisel (sometimes)
- Level (so your lock isn’t crooked)
- Safety glasses (if drilling)
Essential Tools for Smart Lock Door Prep
Most smart lock kits include a template for drilling. Use it! Mark your holes before drilling.
8. Troubleshooting: When Things Get Weird
Sometimes, despite your best efforts, things don’t fit perfectly. Don’t let it get you down!
Troubleshooting Door Fit for Smart Lock
- Lock doesn’t fit in the hole: Double-check measurements. You may need to widen the hole.
- Deadbolt won’t extend fully: Check strike plate alignment and door thickness.
- Lock feels loose: Add a door reinforcement plate or longer screws.
Smart Lock Installation Problems and Solutions
- Smart lock isn’t turning: Try removing and reinstalling, making sure nothing is blocking the mechanism.
- Electronics not working: Make sure batteries are fresh and contacts are clean.
- App won’t connect: Double-check WiFi/Bluetooth range and follow app instructions.
9. Case Study: Alex’s Smart Lock Makeover
Let’s tell a little story. Alex had an old wooden door, loved the idea of keyless entry, but felt nervous about installation. With a little patience, Alex:
- Measured the door (it was a perfect fit!)
- Removed the old deadbolt (after a stubborn screw or two)
- Widened the hole using a borrowed hole saw
- Aligned the strike plate and even reinforced the door frame with longer screws
- Sealed the edges with weatherstripping to keep rain out
Now, Alex opens the door with a smartphone every day and feels like a tech wizard.
10. Final Touches: Double-Check Everything
Before you pat yourself on the back, check:
- The lock fits snugly
- The deadbolt slides smoothly and fully extends
- All screws are tight, but not so tight you strip the holes
- Electronics are working and connected to your app
If everything looks good, you’re all set!

Conclusion: Give Your Door the Upgrade It Deserves
Getting ready for a smart lock isn’t rocket science, but skipping the prep is like trying to bake a cake without measuring the flour. It just won’t turn out right.
Measure carefully, use the right tools, and don’t be afraid to reinforce your door. In the end, you’ll have a secure, stylish, and oh-so-convenient smart lock that’ll make you wonder how you ever lived without it.
So, are you ready to level up your home security and make lost keys a thing of the past? Prep your door the right way, and step into the future!
Curious about the best smart locks for your door type? Or need more hands-on help with your setup? Check out our smart lock reviews and easy installation guides. Your perfect keyless life is just a click away!